
Welcome to your 7-day free trial of the Power Automate Xero Connector
Thank you for signing up for a free trial. Your trial is active for 7 days. The best way to evaluate the connector is to build one real automation using your own Xero organisation and Power Automate environment.
By the end of the trial, you should know whether the connector can save time, reduce manual entry, or remove an integration problem in your business.
You do not need to cancel your trial. No credit card required.
The trial will simply expire after 7 days unless you choose to purchase a license.
Let’s create your first working Xero Flow
Start with one simple Flow before testing more advanced scenarios. This confirms that your Xero connection, tenant selection, permissions, and field mapping are working correctly.
Step 1: Create your Xero connection
In Power Automate, add an Action or Trigger from the Xero Accounting - Magnetism connector. When prompted, select Sign in and authorise access to your Xero organisation.
You can create the connection from inside a Cloud Flow, or from the Connections area in the Power Automate maker portal.
Goal: Your Xero connection shows as connected and is ready to use in a flow.
Contact Us if you need help!
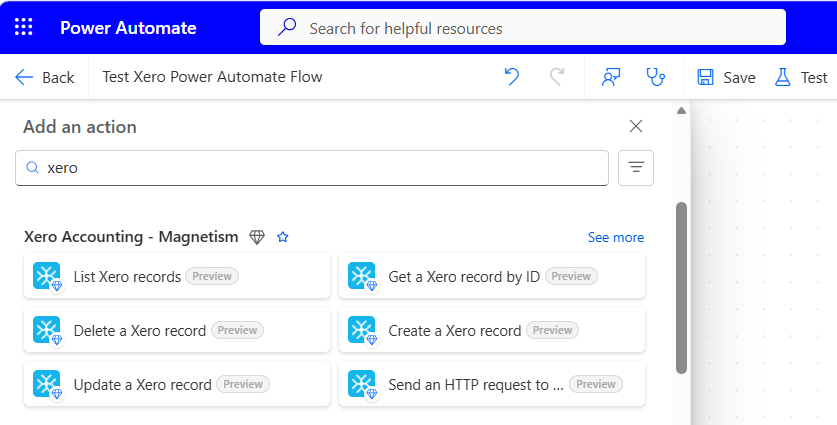
Step 2: Select your Xero Tenant ID
After authorising Xero, select the Xero tenant or organisation you want the Flow to use. Actions include a Tenant ID field so Power Automate knows which Xero organisation to send data to or retrieve data from.
If you are moving Flows between environments, consider storing the Tenant ID in an environment variable.
Goal: Your Flow is pointing to the correct Xero organisation.
How: Select your Tenant ID from the dropdown on any Xero Accounting - Magnetism Action or Trigger. Then use Code view to copy the xero-tenant-id parameter value.

If you want to store the Tenant ID in a variable, create an environment variable (e.g. called Xero Tenant Id) with the current value copied from above. Then reference this by selecting Enter custom value from the Tenant ID dropdown.

Contact Us if you need help!
Step 3: Build one simple test flow
Choose one small workflow that is easy to verify in Xero. Good first tests include:
Create a Xero contact
Create a Xero invoice
Retrieve a Xero invoice by ID
List Xero contacts
Retrieve payment status from Xero
Avoid starting with your most complex end-to-end integration. First prove that the connector works with a small, controlled Flow.
Goal: One Xero action runs successfully from Power Automate.

Contact Us if you run into any issues.
Step 4: Run the Flow and confirm the result
Run the Flow with sample or real business data, then check the results.
Confirm that:
The record was created or retrieved successfully
Required fields are populated correctly
Contacts, invoices, payments, tax rates, and tracking categories appear as expected
The Flow is using the correct Xero tenant
Any errors are understood and can be resolved
Goal: You can see a successful result.
Upgrade to a full license
Your trial lasts for 7 days. To continue using the connector after the trial period, you will need to purchase a license.
Each license gives you continued access to the Xero Accounting - Magnetism connector, including supported Xero actions and triggers for invoices, contacts, payments, credit notes, tracking categories, tax rates, and more.
If you are unsure which license you need, contact us before purchasing and we will help confirm the right option for your setup.
What to test before your trial ends
Before the 7-day trial expires, aim to answer these questions:
Can you connect to the correct Xero organisation?
Can you run at least one successful Xero action from Power Automate?
Can you create or retrieve the Xero records your business needs?
Are the required fields, tax rates, tracking categories, and contacts mapping correctly?
Does the Flow save time and/or reduce manual entry?
Would this automation be useful if it kept running after the trial?
If the answer is yes, activate a paid license before the trial ends so your flows keep running without interruption.
Common setup notes
Use the right Xero user
Each connection is linked to a specific Xero user. We recommend authorising the connector with a suitable administrative or service-style Xero user where possible, rather than a temporary personal user. This helps avoid future issues if a staff member changes roles, loses permissions, or leaves the business.
Check Xero permissions
If an action fails, check that the authorising Xero user has the required access to the relevant Xero organisation and record type. For example, invoice, payment, contact, tax rate, and tracking category operations may require the user to have appropriate accounting permissions in Xero.
Confirm the tenant
If you have access to multiple Xero organisations, make sure the flow is using the correct Tenant ID. Selecting the wrong tenant is a common reason a flow appears to run but the expected data is not visible in the Xero organisation you are checking.
Start small
Do not begin with the most complex workflow in your business. Start with one small action, confirm it works, then add extra steps. This makes setup faster and makes troubleshooting much easier.

